Japanese curry bread, also called curry pan, is one of those savoury buns that looks simple from the outside and turns out to be much more engineered than it seems. A good one balances a soft yeast dough, a thick Japanese curry filling, and a crisp panko shell that stays intact instead of leaking oil. In this article I break down what makes the dish work, how it differs from other filled breads, and how to make a version that actually holds together at home.
The essentials at a glance
- It is a filled bread, not a pastry. The dough is soft and yeasted, while the coating is usually panko.
- The curry has to be thick. A loose sauce is the most common reason the bun splits or turns greasy.
- Deep-frying is still the classic method. Baking and air-frying work, but the texture changes noticeably.
- It works best as a hot lunch or substantial snack. In the UK, it fits neatly beside salad, soup, or a simple side of pickles.
- Technique matters more than fancy seasoning. Sealing, resting, and oil temperature do most of the heavy lifting.
What this filled bread is really like
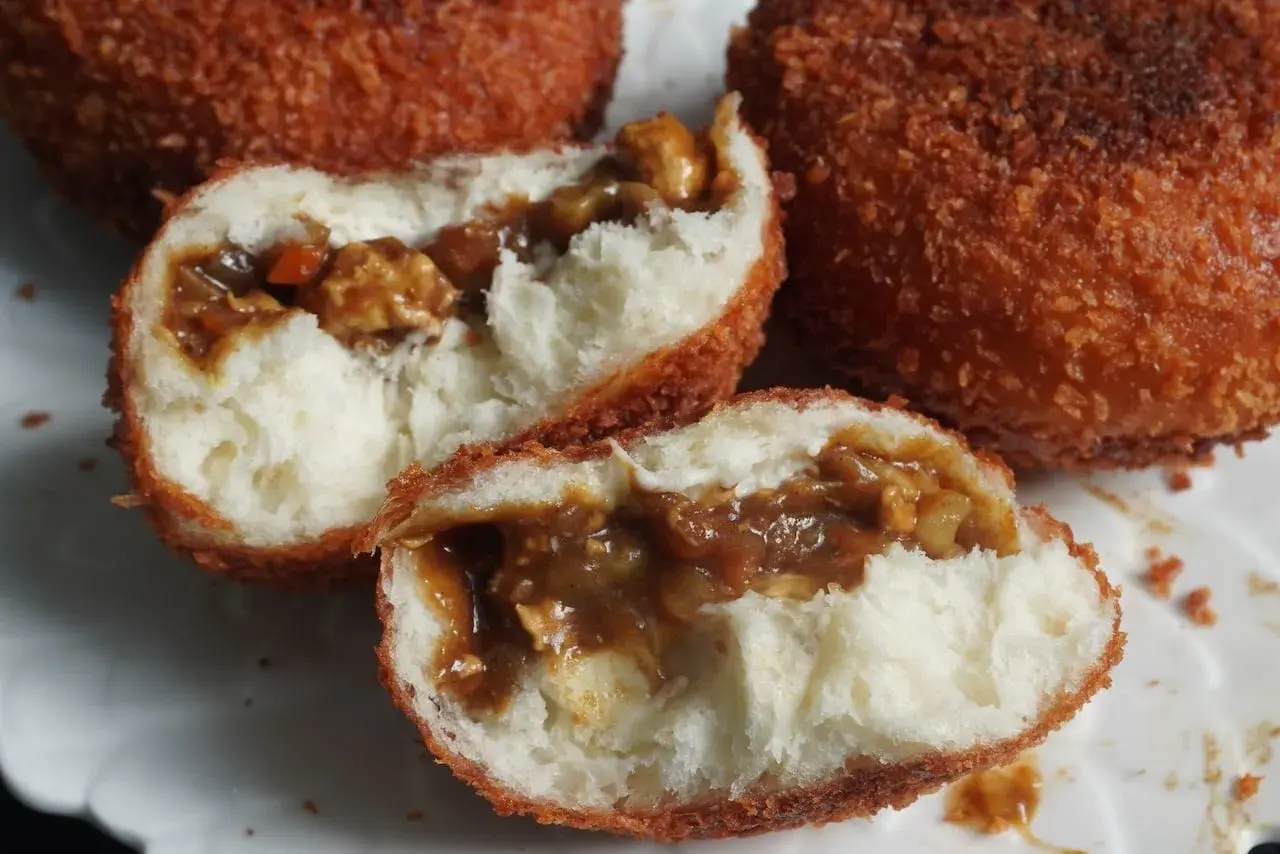
Think of it as Japanese bakery comfort food with a clear job to do: hold a rich curry filling inside a bread shell that can be eaten by hand. The shape is usually oval or round, the crumb is soft and slightly sweet, and the outside has that familiar panko crunch that makes the first bite feel more dramatic than a normal roll. Most versions are made with Japanese curry rather than a looser, spicier curry sauce, because the dish needs structure as much as flavour.
The exact origin is usually traced to Tokyo in the 1920s, although the story is not perfectly settled. That uncertainty does not really matter to the eater; what matters is that the bun sits neatly between snack food and a proper meal. I would place it closer to a lunch item than to a pastry, especially when the filling is generous and the dough is well made.
It is also worth separating it from similar foods. A curry puff relies on pastry and a flakier shell; a British pasty is heavier and more enclosed; this bun uses bread dough and a breadcrumb crust, which gives it a different bite entirely. Once you understand that distinction, the rest of the recipe logic makes more sense.
That texture puzzle is the reason the filling, dough, and coating all have to work together.

Why the filling and crust have to be built for each other
The biggest mistake I see is treating the curry as if it were just a normal sauce. It is not. For this bread to work, the filling should be thick enough to sit in a spoon without running off, and cool enough to shape without steaming the dough from the inside. If you use leftover curry, reduce it first so it becomes dense, glossy, and moundable.
The crust has a job as well. Panko is not there only for crunch; it also helps create a dry, protective outer layer that fries cleanly and gives the bun a bakery-style finish. If the dough seam is weak, the filling will escape. If the filling is too wet, the bun can split and the oil will soak through the crust. When both parts are right, you get a clean cross-section instead of a greasy collapse.
- Too much filling turns the bun hard to seal.
- Filling that is still warm makes the dough slack and harder to handle.
- Coating that is too light gives you patchy browning instead of an even crust.
- Oil that is not hot enough leaves the bread heavy and oily.
This is why the best versions feel deliberate rather than improvised. The structure is doing real work, and the flavour is stronger because of it. From here, the next decision is whether you want the classic fried result or a lighter variation.
Deep-fried, baked, or air-fried versions each change the result
Deep-frying gives the most recognisable version: a crisp shell, a tender crumb, and the slight richness that makes bakery curry bread so satisfying. But home cooks do not always want a pot of oil on the hob, so baked and air-fried versions have become common. They are legitimate options, but they are not identical, and I think it helps to be honest about the trade-offs.
| Method | Texture | Best use | Trade-off |
|---|---|---|---|
| Deep-fried | Most authentic, deeply crisp, best colour | Best when you want the classic texture | Needs careful oil control and a little more cleanup |
| Baked | Lighter crust, softer bite, still satisfying | Better for batch cooking or lower-oil cooking | Less blistered, less rich, more bread-like |
| Air-fried | Fairly crisp with a dry finish | Useful for small batches and weekday cooking | Can dry the edges if you forget a little oil |
For a frying version, I would aim for oil at 170-175C and a cook time of roughly 2-3 minutes per side, depending on size. In the oven, 200C for 15-18 minutes is a sensible starting point. In an air fryer, 180C for about 8-10 minutes usually works, but the exact timing depends on how large the bun is and how much filling it carries.
My rule is simple: if you want the most bakery-like result, fry it; if you want convenience, bake it; if you want a compromise, air-fry it. The method matters, but the shaping matters even more.
How I would make one at home without leaks
Start with a curry that has already been reduced. If it looks like stew, keep simmering. I want a filling that can be scooped and stays where it is. Let it cool completely, then shape the dough into small rounds or ovals and rest them briefly before filling. A slightly enriched dough works best in my experience because milk or butter gives a softer bite that contrasts nicely with the crust.
- Flatten each dough round into a small oval and place the filling in the centre.
- Pinch the edges tightly and seal the seam completely.
- Set the bun seam-side down for a short rest so the seal can settle.
- Dust lightly with flour, dip in beaten egg, then coat with panko.
- Fry at 170-175C until evenly golden, or bake if you want a lighter version.
The seams are the weak point, so I always press them more firmly than feels necessary. That extra pressure is worth it. A bun that is sealed properly can be handled, cooked, and sliced without a curry spill, which is exactly what you want if you plan to serve it as a main rather than as a novelty snack.
Two other details matter more than most people expect: letting the shaped buns rest before frying, and draining them on a rack rather than straight onto a plate. The first helps the dough relax; the second keeps the underside from steaming itself soft.
How to serve it as a meal in a UK kitchen
This is a rich bun, so I like to serve it with something sharp, light, or crunchy. A simple cabbage salad, pickled vegetables, a clear soup, or even a tomato-heavy side all help cut through the richness. If you put it beside another heavy dish, the meal starts to feel clumsy very quickly.
In the UK, it works especially well as a lunch item because it is easy to recognise and easy to eat by hand. One large bun can stand in for a light main. Two smaller buns feel more like a fuller lunch. If you are packing it for later, let it cool completely first; otherwise trapped steam softens the crust and you lose the texture that makes it interesting in the first place.
For bento-style packing, I would wrap it in parchment or place it in a separate section of the lunch box rather than pressing it against wet sides or saucy dishes. That small decision protects the crust and keeps the filling from making the bread soggy. It is one of those practical details that sounds minor until you taste the difference.
Once you start thinking of it as a meal component rather than just bakery output, the dish becomes easier to use well.
The small choices that decide whether it tastes bakery-good
- Use thick curry. The filling should be spoonable, not pourable.
- Keep the dough soft but not sticky. A lean dough can work, but a little richness improves the bite.
- Seal the seam with care. A neat seal is more important than a perfect shape.
- Watch the oil temperature. Too cool makes the crust greasy; too hot browns the outside before the centre is ready.
- Serve it soon after cooking. The crust is best when it is still crisp, usually within 20 to 30 minutes.
If I were making this for the first time, I would choose a straightforward chicken or beef curry filling rather than something heavily customised. That gives you a cleaner benchmark for judging the bread itself: the softness of the crumb, the quality of the seal, and the amount of crunch in the coating. Once those basics are right, it is easy to move on to cheese, vegetables, or a baked version later.
What makes this bun memorable is not complexity. It is the balance between richness, structure, and texture, and that balance is why the best versions disappear fast while the mediocre ones feel greasy after two bites.