
A good grilled eel dish is all about balance: smoky char, glossy glaze, and rice that can carry the sauce. In Japanese home cooking, the result looks simple, but the details matter: the cut of the fish, how hot the grill is, how often you baste, and whether you serve it as a bowl or a plated main. This guide covers the style, the cooking method, what to buy in the UK, and the mistakes that turn a rich dish into a dry one.
What you need to get right before the first flip
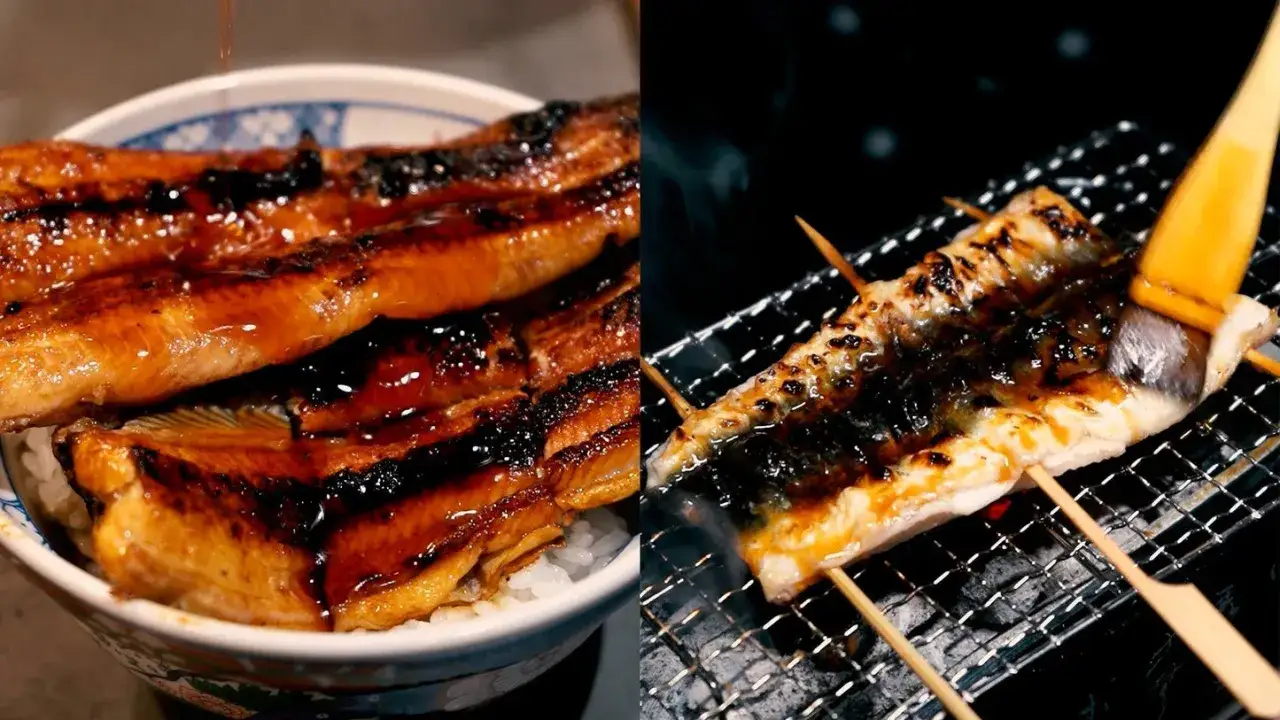
- Kabayaki is the classic approach: eel fillets are glazed, then finished over direct heat until the sauce darkens and clings.
- For most UK kitchens, frozen or vacuum-packed fillets are easier to manage than whole eel.
- Rice is part of the dish, not an optional side; plain short-grain rice gives the glaze somewhere to go.
- Medium-high heat and short basting cycles matter more than marathon grilling.
- Traceable sourcing is worth the extra effort because eel stocks remain under pressure in the UK and Europe.
What makes eel work as a main dish
I think the appeal comes from contrast. The flesh is rich, the glaze is sweet-savoury, and the grain of rice beneath it keeps the meal grounded. The classic Japanese version is kabayaki: the eel is split, cleaned, glazed with tare, then cooked until the surface turns lacquered and just a little sticky. Tare is the sweet soy glaze that builds flavour during grilling; it is not just a finishing dip.
That direct heat is doing two jobs at once. It cooks the fish through and concentrates the glaze so you get a darker, more savoury edge without losing the tenderness underneath. If you want a simple dinner that still feels special, this is the version I would choose over a plain salt-grilled fillet, because the sauce and smoke do most of the heavy lifting. From here, the real question is what to buy and how to handle it well.
How to choose the right eel in the UK
In the UK, the most practical route is usually a pre-prepared fillet, often frozen or vacuum-packed. I would look for clear labelling on species, origin, and whether the eel is already cooked or needs a full grill finish. That matters for both flavour and timing, because a pre-cooked fillet only needs reheating and glazing, while a raw one needs more careful work.
| Option | Best for | What I look for | My take |
|---|---|---|---|
| Frozen fillets | Most home kitchens | Even thickness, tight packaging, and a clear origin | Usually the easiest balance of convenience and consistency. |
| Vacuum-packed cooked fillets | Fast dinners and bento | Enough sauce to reheat well, not a sweet glaze that tastes flat | The most forgiving option when you want a reliable result. |
| Fresh fillets | Best texture if you have a good fishmonger | Firm flesh, no strong fishy smell, and precise preparation instructions | Worth it when the supplier is excellent, but not the easiest starting point. |
One more point is worth taking seriously: eel is not a casual buy. UK guidance still treats European eel as critically endangered, so I prefer traceable sourcing and farmed or clearly identified imports rather than mystery product. Once the fish is chosen, the grill method matters more than any fancy garnish.
How I grill eel over direct heat without burning the glaze
For the grill itself, I keep it simple: hot, not reckless. A medium-high oven grill or a charcoal barbecue works; a grill pan is the fallback if that is all you have. The mistake is cranking the heat so hard that the sugar in the glaze burns before the centre warms.
| Starting point | Heat | Timing | What I watch for |
|---|---|---|---|
| Pre-cooked fillet | Medium-high grill | About 1 to 2 minutes per side | The glaze bubbles, tightens, and starts to shine. |
| Fresh fillet | Medium-high grill | About 3 to 4 minutes per side | The flesh turns opaque and flakes cleanly at the thickest point. |
| Thick fillet | Moderate direct heat | About 6 to 8 minutes total | The surface caramelises without blackening in patches. |
- Pat the fillets dry and let them sit for about 15 minutes if they are chilled.
- Brush on a thin layer of tare before the first pass; too much sauce too early can slide off.
- Place the eel over direct heat and leave it alone long enough for the surface to set.
- Turn, brush, and repeat in short cycles so the glaze builds in layers rather than pooling.
- Stop as soon as the flesh is opaque and tender; if you keep going for colour alone, the fish loses its softness.
If you are using a barbecue, keep the grate clean and the fillet lightly oiled so it does not stick. A little smoke is welcome; a flare-up is not. After that, serving it well is what makes the plate feel complete.
What to serve with it so the plate feels complete
For dinner, I would serve the eel over plain short-grain rice with pickles, a small bowl of miso soup, and a sharp accent like sansho pepper. Sansho is the Japanese pepper with a citrusy, slightly numbing bite, and it cuts through the richness without making the plate feel busy. If you turn the fish into a rice bowl, you get unadon, the familiar format where the sauce is allowed to soak into the rice instead of sitting on the surface.
| Serving style | What to include | Why it works |
|---|---|---|
| Rice bowl | Rice, eel, extra tare, and a pinch of sansho | Fast, rich, and very effective when you want the glaze to carry the meal. |
| Plated dinner | Rice, miso soup, pickles, and greens | Better contrast and a cleaner finish for a sit-down meal. |
| Bento | Smaller eel portion, firmer rice, and drier side dishes | Keeps the box neat and prevents the rice from turning soggy by lunchtime. |
For bento, I would cool the eel before packing it and keep any extra sauce in a separate compartment if possible. That keeps the texture intact and makes the lunch feel deliberate rather than leftover-heavy. Even so, a few avoidable mistakes still trip people up.
The mistakes that usually spoil the texture
The first mistake is the most common one: too much heat too soon. Sugar burns faster than fish cooks, so the outside can turn bitter while the centre is still underdone. I would rather use a steady medium-high grill and one extra minute than chase colour with a blazing element.
- Using too much glaze at the start makes the surface heavy before it has a chance to caramelise.
- Skipping the drying step leaves too much moisture on the fish, so the sauce loosens instead of setting.
- Turning the fillet too often interrupts the crust and gives you a patchy finish.
- Cooking until it looks dark rather than done is how eel turns stringy instead of supple.
- Ignoring the rice makes the dish feel unbalanced, because the glaze wants a neutral base.
- Buying unlabeled product leaves you guessing about species and sourcing, which matters more than people admit.
If I had to choose one thing to watch, it would be temperature control. Once you get that right, the rest of the dish becomes much easier to trust. That leaves the version I would actually cook on a weeknight.
The version I would cook again on a busy weeknight
If I were making this for a normal dinner, I would buy a pre-cooked fillet, warm the rice first, and treat the grill as a finishing tool rather than the place where everything has to happen from scratch. That gives you the lacquered surface and keeps the fish moist without turning the process into a project.
The dish works because it is direct and unfussy: a well-handled fillet, steady heat, and a bowl of rice that does its job. Once you have that balance, you can build it into a simple dinner or a bento without changing the core method at all. If you want a Japanese main dish that feels special without being complicated, this is one of the most satisfying ways to do it.