The essentials at a glance
- Use boneless pork belly cut into large chunks for the most even braise; skinless is simpler, skin-on needs a different finish if you want crackling.
- White or barley miso gives the cleanest balance; red miso works, but it needs a lighter hand.
- Keep the braise gentle for about 2.5 to 3 hours, or the pork turns greasy before it turns tender.
- Ginger, spring onion, soy, mirin, and a little sake give the dish its Japanese home-cooking character.
- Serve it with plain rice, something green, and a little acidity so the richness stays in check.
- Leftovers are excellent the next day, especially in a rice bowl or bento.
Which cut and miso give the best result
The best version of this dish comes down to two decisions: the cut of pork and the type of miso. Pork belly is naturally rich, so I want a cut that can handle a long braise without falling apart too early, and I want a miso that adds depth without flattening everything else into one salty note. Once those two pieces are right, the rest of the dish becomes much easier.
Choosing the miso
| Miso type | What it brings | How I use it |
|---|---|---|
| White miso | Mild, slightly sweet, and very forgiving | My safest all-round choice for a first attempt |
| Barley miso | Deeper umami with a rounder, more rustic flavour | My favourite for a braised pork belly dish |
| Red miso | Stronger, saltier, and more assertive | Use in a smaller amount, or blend it with white miso |
I usually start with white or barley miso because the pork already carries plenty of intensity. Red miso can work beautifully, but it punishes sloppy measuring; it is better when you already know how salty your paste runs. Once you pick the miso, the next question is the pork itself.
Read Also: Easy Japanese Recipes - Simple Dinners for UK Kitchens
Choosing the pork belly
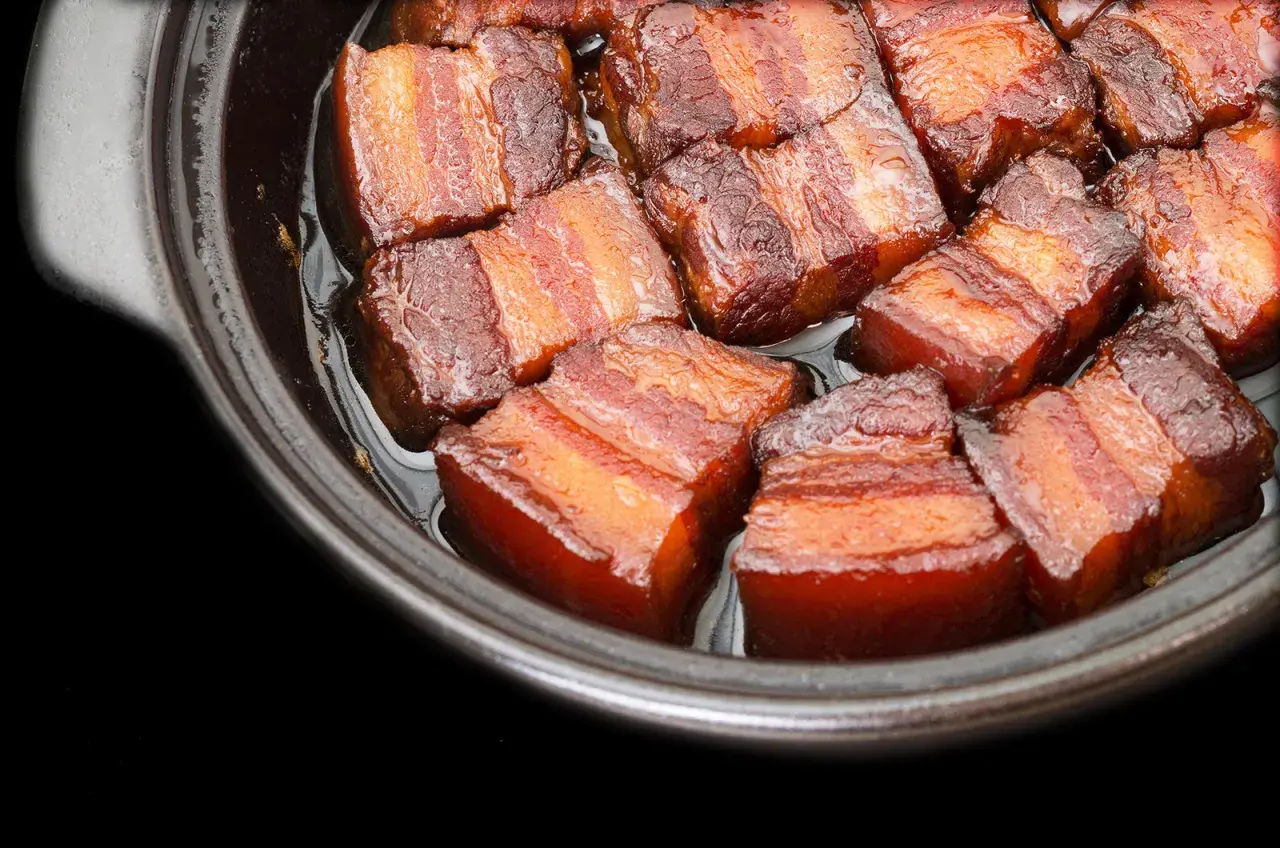
For a proper braise, I prefer boneless pork belly cut into large chunks, roughly 5 cm across. That size gives the fat time to melt into the sauce without the meat disappearing into shreds before the flavour has developed.
- Skinless belly is the least fussy option and the easiest to portion.
- Skin-on belly gives a richer result, but braising alone will not create crackling; if you want crisp skin, that is a separate finishing step.
- Pre-cut slices are fine for a quicker pan version, but they are not my first choice for this style of dish.
For the version below, I use about 1 kg of pork belly for four people. That gives generous portions without leaving you with a sauce that overwhelms the plate. Once the cut and miso are settled, the real work is making the flavour hang together instead of feeling blunt.
The ingredient balance that keeps it savoury, not heavy
What makes this dish satisfying is not just the miso itself. It is the way miso, soy, mirin, sake, and water support one another so the sauce tastes layered rather than simply salty. I like to think of the liquid as a braising broth that slowly turns into a glaze.
| Ingredient | Amount for 4 | What it does |
|---|---|---|
| White or barley miso | 4 tbsp | Provides body, umami, and the signature savoury base |
| Light soy sauce | 3 tbsp | Adds salt and depth without making the sauce too dark |
| Mirin | 100 ml | Rounds the saltiness and gives the sauce shine |
| Sake | 80 ml | Lifts the aroma and helps the pork taste cleaner |
| Water or unsalted dashi | 300 ml | Turns the paste into a proper braising liquid |
| Caster sugar | 1 tsp, optional | Softens the edges if the miso is very assertive |
I keep the sugar light because the mirin already brings sweetness. If I am using barley miso, I often do not need sugar at all. If I am using red miso, I may add that teaspoon, but I usually solve saltiness with more liquid and a longer reduction rather than more sweetness. If you cannot find sake, a little extra water and a splash of dry sherry will keep the dish workable, though the aroma will be slightly different. With the balance set, the cooking itself becomes straightforward.

How I cook it step by step
This is the method I trust in a regular kitchen. It is not showy, but it is dependable, and that matters more with pork belly than with many other cuts. The goal is simple: clean the pork, brown it lightly, then let it braise slowly until the meat gives way without turning greasy.
-
Cut the pork belly into large chunks, about 5 cm wide. Bring a saucepan of water to the boil and blanch the pork for 2 minutes, then drain and rinse well. This removes surface impurities and keeps the final sauce cleaner.
-
Slice a good thumb of ginger into chunky pieces and set aside a little for garnish. Trim 3 or 4 spring onions, keeping the pale parts separate from the green tops.
-
Heat 1 tbsp neutral oil in a heavy-based casserole or deep saucepan. Fry the ginger pieces and the pale spring onion sections for a minute or two until fragrant, then add the pork belly and brown it lightly on all sides.
-
In a bowl, whisk together the miso, soy sauce, mirin, sake, water or dashi, and sugar if you are using it. Make sure the miso is fully dissolved before it goes into the pan, because little lumps become harder to smooth out later.
-
Pour the braising liquid over the pork, bring it just to a simmer, then cover and turn the heat right down. Cook gently for about 2.5 to 3 hours on the hob, or in a covered oven dish at 160°C, until the pork is very tender.
-
Uncover for the last 10 to 15 minutes if the sauce needs reducing. I want it glossy enough to coat the meat, not so thick that it tastes sticky before it reaches the table. Finish with the reserved spring onion greens and julienned ginger, then serve with rice.
I do not rush the simmer. A hard boil here works against you, because it pushes fat into the sauce too quickly and can make the pork taste blunt rather than rich. Once the method is clear, the next challenge is controlling texture, which is where most home cooks either overthink it or not enough.
How to get the texture right every time
Most problems with this dish are heat problems, not flavour problems. If the pork is greasy, the liquid is too thin, or the sauce tastes overly salty, the fix is usually in the cooking rhythm rather than in adding more ingredients. I find it helps to treat the braise as a conversation: start gently, taste late, and only reduce when the pork is already close to tender.
| Problem | Likely cause | What I do |
|---|---|---|
| Pork feels greasy | The heat was too high, or the pork was not blanched first | Blanch the meat next time and keep the simmer low enough that only small bubbles break the surface |
| Sauce tastes too salty | Too much reduction, or red miso used too aggressively | Add a little hot water or unsalted dashi, then finish with a small splash of mirin |
| Pork is still firm after 3 hours | The chunks were too large, or the simmer was too low | Keep cooking until a skewer slides in with little resistance |
| Sauce is thin | Not enough reduction at the end | Uncover and reduce for 10 to 15 minutes, stirring once or twice |
If I keep the skin on, I do not expect crackling from the braise itself. That is a separate finish and requires a hot grill or pan once the pork is already tender. For this dish, I usually prefer the meat to stay soft and glossy rather than trying to force a roast-style finish. Once the texture is right, the question becomes what to put around it so the richness feels complete instead of exhausting.
How I serve it as a main dish or in a bento
I treat this as a proper main course, not a small garnish dish. The pork is rich enough to lead the plate, so the sides should sharpen and lighten the experience rather than compete with it. Plain Japanese rice is still the best anchor, because it catches the sauce without stealing the flavour.
- Rice: short-grain or sushi rice, steamed and lightly salted if you like.
- Greens: blanched pak choi, tenderstem broccoli, or wilted spinach.
- Something sharp: quick-pickled cucumber, rice vinegar-dressed cabbage, or lightly pickled daikon.
- Finish: sliced spring onion, julienned ginger, and a pinch of toasted sesame seeds.
For a bento, I prefer to cool the pork completely before packing so the fat does not steam the rice. A small compartment for the sauce works well, or I spoon just enough over the pork so it clings rather than pools. The dish also works as a rice bowl if you want a quicker lunch: pork over rice, greens on the side, and a bright pickle to reset the palate. That flexibility is why I keep coming back to this style of cooking, and it leads naturally into the ways you can adapt it without losing the point of the dish.
Variations, swaps, and make-ahead notes
The core idea is stable, but a few small adjustments can move the dish in different directions. I would not overcomplicate it, yet I also would not pretend every pantry is identical. The recipe still works if you make sensible substitutions, as long as you keep the balance between sweetness, salt, and umami intact.
| Option | When I use it | Trade-off |
|---|---|---|
| White and barley miso blend | When I want a rounder flavour without losing brightness | Less single-note sweetness than white miso alone |
| Red miso plus white miso | When I want a deeper, darker sauce | Needs tighter control over soy and reduction |
| Oven braise at 160°C | When I want steadier heat and less stovetop watching | Less immediate control over the sauce |
| Slow cooker on low | When hands-off cooking matters most | The sauce usually needs a separate reduction at the end |
- For more heat: I add shichimi togarashi at the table, not in the braise, so the spice stays bright.
- For a lighter flavour: I use more white miso and keep the garnish sharper with extra ginger and spring onion.
- For storage: I keep leftovers in the fridge for up to 3 days, or freeze them in portions for about 2 months.
- For reheating: I warm the pork gently with a splash of water so the sauce loosens instead of tightening into a paste.
I find the dish actually improves after a night in the fridge, because the sauce settles and the pork firms up just enough to slice neatly. That is one reason it works so well for lunch boxes and make-ahead meals. The last step is not another technique; it is making sure the finished plate has the contrast it needs.
The last details I check before it reaches the table
Before I serve this dish, I check three things: the pork should yield without falling apart, the sauce should cling rather than flood the plate, and the garnish should bring freshness back into the bite. If it tastes flat at the end, I reach for a few drops of rice vinegar before I add more soy, because acidity often solves what salt only masks.
- Tenderness: a fork should slide in with little resistance.
- Glaze: the sauce should coat the meat and leave a sheen on the spoon.
- Balance: the garnish and sides should cut through the richness, not echo it.
- Heat: warm plates help, because pork belly cools quickly and gets denser as it sits.
When those details are in place, the dish stops feeling like a heavy braise and starts feeling like a complete Japanese-style main course. That is the version I return to most often: simple enough to cook on a regular evening, but layered enough to feel deliberate from the first bite to the last.